Harmful Facts about mobile phones So, mobile phones and the radiation they emit is the talk of the town. And why not? This thing that emits radiation stays so close to our body all the time. And haven't we heard that radiation can cause cancer Our concern is indeed justified. And the concern has been renewed again by Akshay Kumar's past yearly released movie 2.0 So, if mobile radiation means DANGER! or CANCER! to you as well and you want to know the science behind the harm that your mobile might cause you , then you have come to the right place! And since you are already here, let's try to understand if mobile radiation are really harmful to human health Really? Before understanding the mobile radiation effects on human health let's try to understand where is the phone emitting radiations from? For this, you'll have to understand how mobile phones work? So, whenever you talk to someone through your phone or send someone a message your phone converts your voice ...
How to change a rough or transparent background of an image to a colorful background(using gradient and patterns) in Photoshop CC
How to change a rough or transparent background of an image to a colorful background(using gradient and patterns) in Photoshop CC:-
Hello,I am Saheb and you are welcome again to my Blog. I'm here to guide you about how to change a rough or transparent background of an image to a colourful or an another background.
I want to convey you that I have attached some video clips so that you can do this very easily. Also proper picturization is there but videos can attract your eyes more quickly....
Let's start :-
1. Open your Photoshop CC and select your image which's background you want to change.

2. Then select the 4th tool i.e. "Quick selection tool" from the Tool Box.
3. Select the person's body part with that tool so that the zebra-colored line shall attach the person's body part and the rough background shall not be attached to it.
 |
| Select the part of the concerned face which you want to extract |
4. Then drag your mouse pointer and give a right click to find an option named "Layer via Cut". Click on that. You will find that an another background will be created. Just below that layer, select the permanent layer and uneye that.... you will find that a Transparent background image will be formed leaving the concerned face in the center.
 |
| Select 'Layer via cut 'option |
 |
| Select the newly formed background. |
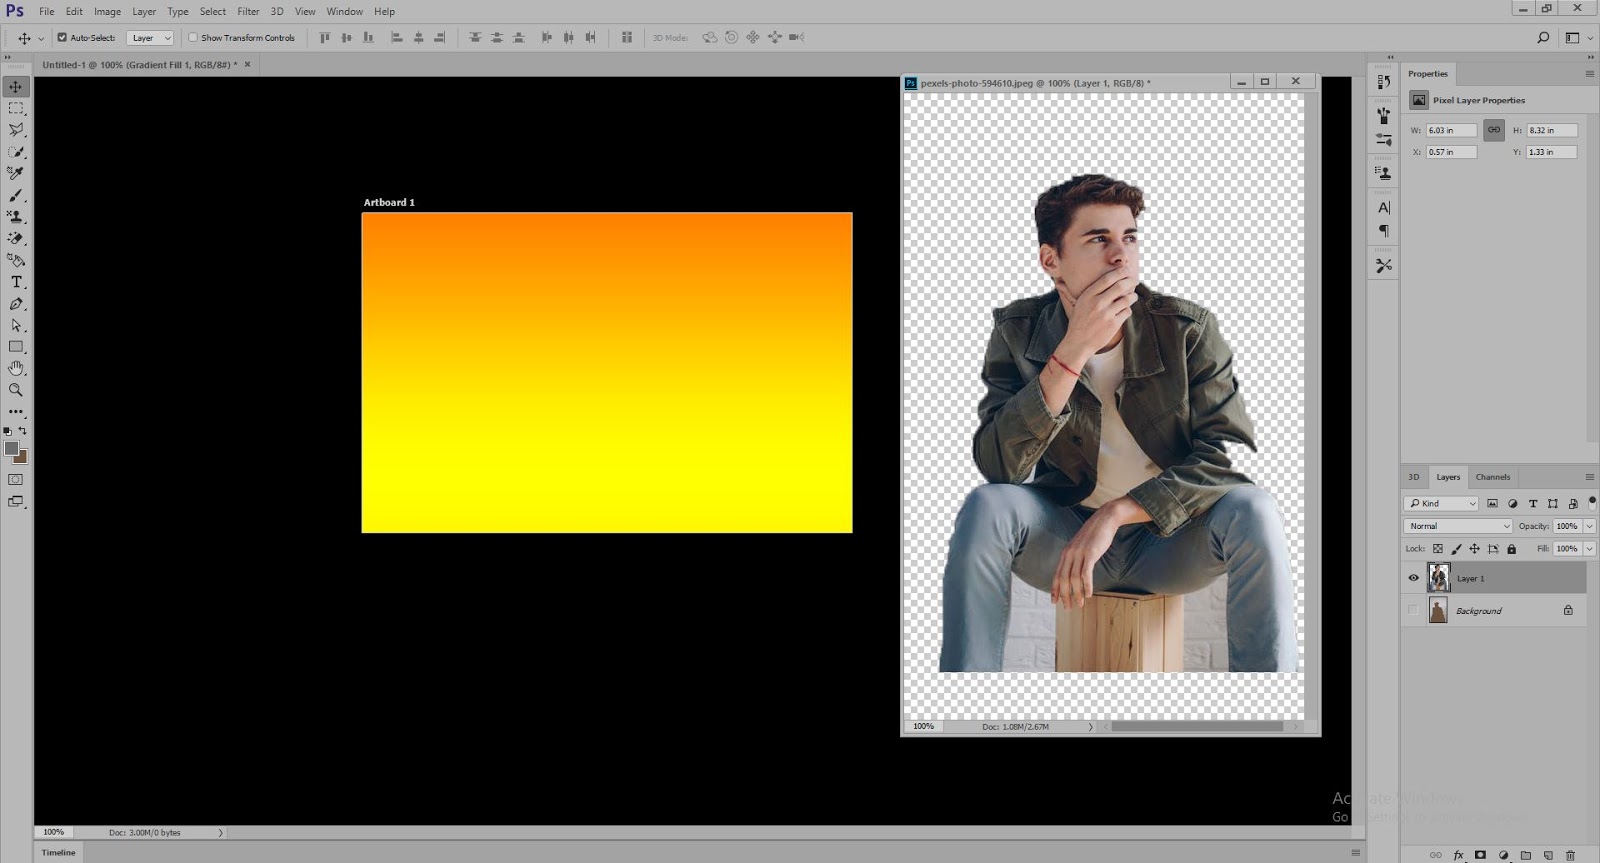
5.Then,click on 'Move' tool and go to Files option and click on 'New' option and create a blank (white colored) background . Then go to the extreme right position of Photoshop to find a small option which will soon open a dialog box like this:-


The image is not still but this information is heavily required
6. Click on Gradient option or Pattern option ...then you will find that there will be many gradients and patterns.. Select any one pattern or gradient as per your choice . A new background will be formed.
7. Drag the cursor to the first jpeg image which you have edited a moment ago.
Then place it on the current gradient or pattern background. Use the 'Move' tool to move the concerned face to that background of your newly formed background.
6. Click on Gradient option or Pattern option ...then you will find that there will be many gradients and patterns.. Select any one pattern or gradient as per your choice . A new background will be formed.
7. Drag the cursor to the first jpeg image which you have edited a moment ago.
 |
| Move this to the new background. |
 |
| Drag the concerned face with Move tool and place it on the newly background |
 |
| The image has been placed in the newly background |
Now it's almost done...your newly formed background has the concerned face attached to it. You can delete or minimize the existing face as per your wish.
Video Clips:-
Videos are very interesting. These can also educate you very fastly :-
1. With Gradient :-
2. With Pattern :-
It's an easy method but it's a lengthy process. If you do follow these methods sincerely, then you will be able to do these within a minute.
If you have any problems regarding this...then please comment below so that I can help you to your aid.
Hello, this is my fifth blog post..and I'm a student cum poet ....my pen name is "The Emotional King" ..You can find my poems in an app or a website named Pratilipi... I have provided the link thereby in below..👇👇
https://english.pratilipi.com/user/5nvu69u820?utm_source=android&utm_campaign=authorprofile_share
Plz follow me and don't forget to read my poems...
You can follow me on Instagram:-
https://www.instagram.com/saheb___/?hl=en
Thanks for visiting my blog....🙏🚩
Comments
Post a Comment
If you have any doubts , please let me know..